Your patio furniture sits under a tarp, your garden beds are frozen solid, and somewhere on the internet, people are harvesting lettuce in their living rooms. Welcome to the fifth season—a growing window that exists entirely indoors, powered by nothing more than a windowsill or a cheap LED strip.
The term “5th season gardening” has exploded across social platforms this December, and it’s not about greenhouses or fancy hydroponic towers. It’s about reclaiming the dead months between fall cleanup and spring planting by growing food in the smallest, most overlooked spaces of your home. No yard required. No experience assumed.
What the 5th season actually means
Traditionally, gardeners recognize four seasons, with winter as a period of rest. But indoor winter growing flips that script. The fifth season runs roughly from late November through February, when outdoor soil is too cold or wet to work, but your home environment offers stable warmth and controllable light.
This isn’t about keeping a single basil plant alive on your kitchen counter. The movement centers on intentional food production—microgreens ready in ten days, salad greens in three weeks, herbs that actually taste like something. People are setting up production lines on bookshelves, in closets, even inside unused shower stalls.
The appeal is partly practical (grocery store greens are expensive and often limp by the time you use them) and partly psychological. Gardeners hate being sidelined. Growing something edible in January scratches that itch without requiring a heated greenhouse or a move to California.

Crops that actually work indoors in winter
Not every plant tolerates indoor conditions, and the fifth season has a specific roster of reliable performers. Microgreens top the list—radish, broccoli, and sunflower shoots grow fast, need minimal light, and pack serious flavor. You can harvest them in seven to fourteen days, making them ideal for impatient beginners.
Leafy greens come next. Lettuce, arugula, spinach, and Asian greens like mizuna and bok choy thrive under modest light and tolerate the lower humidity of heated homes. They won’t grow as large as outdoor summer lettuce, but you’ll get tender, sweet leaves perfect for salads.
Herbs are trickier. Basil demands intense light and warmth, making it a poor choice unless you have a south-facing window or supplemental lighting. Parsley, cilantro, chives, and thyme are far more forgiving. They grow slowly but steadily, and a single pot can supply garnish and flavor for months.
Avoid fruiting crops like tomatoes, peppers, and cucumbers unless you’re prepared to invest in serious lighting. They need 12-16 hours of strong light daily, and most beginner setups can’t deliver that intensity.
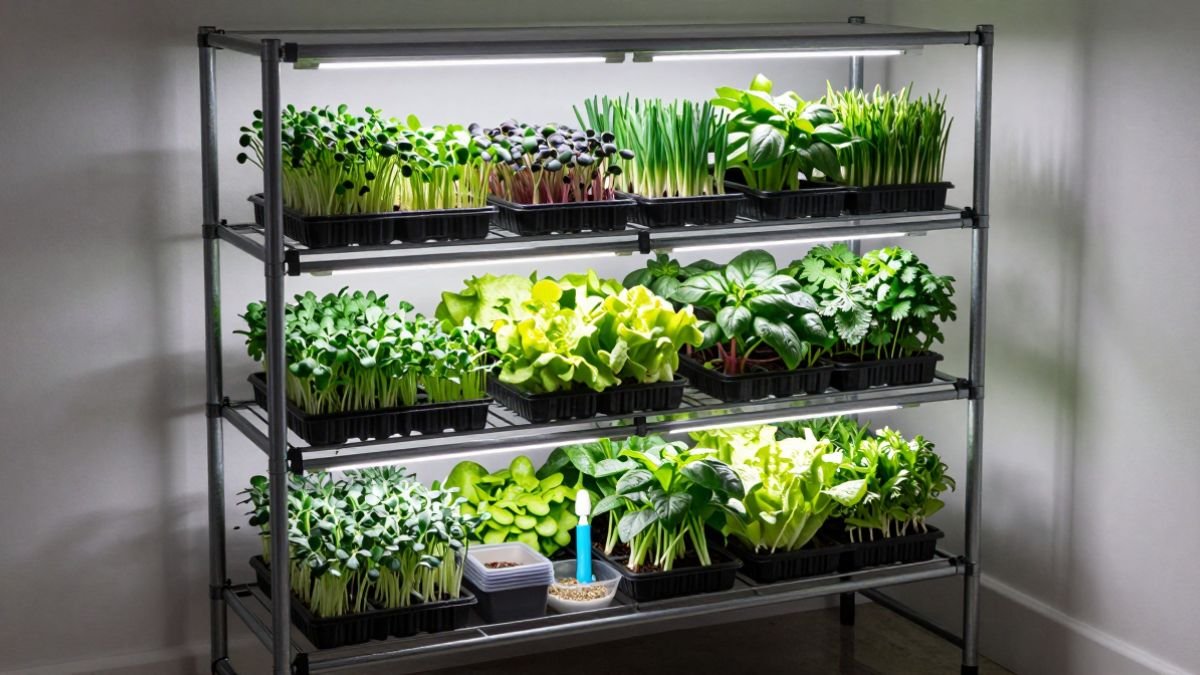
Three setup tiers, from zero to low investment
You don’t need to spend hundreds of dollars to start. The simplest entry point is a sunny windowsill—ideally south-facing in the Northern Hemisphere. Place trays of microgreens or pots of lettuce directly on the sill, rotate them daily to prevent leaning, and water when the soil surface feels dry. This costs almost nothing and works surprisingly well if your window gets at least four hours of direct sun.
The next tier adds artificial light. A basic LED shop light or a clip-on grow bulb costs fifteen to thirty dollars and transforms any shelf or countertop into a growing zone. Hang the light two to four inches above your plants and run it for 12-14 hours daily using a cheap outlet timer. This setup eliminates the window requirement and lets you grow in basements, closets, or dim kitchens.
For those willing to spend a bit more, budget hydroponic kits (the kind with a small reservoir and a pump) offer faster growth and less mess. Brands like AeroGarden dominate this space, but DIY versions using plastic storage bins and net cups cost a fraction of the price. Hydroponics isn’t necessary for success, but it does speed things up and reduces the risk of overwatering.

Where beginners crash and burn
Mold is the first killer. Overwatering combined with poor air circulation creates a perfect breeding ground for fuzzy white or gray patches on soil and seedlings. The fix is simple but requires discipline: water less often, aim for the soil rather than the leaves, and run a small fan on low speed to keep air moving.
Leggy seedlings—tall, pale, and weak—signal insufficient light. If your plants stretch toward the window or grow spindly under a bulb, the light source is either too far away or too weak. Move the light closer, upgrade to a higher-wattage bulb, or increase daily exposure time.
Fungus gnats are the third common frustration. These tiny black flies breed in moist potting soil and swarm around your face when you water. They don’t harm mature plants much, but they’re annoying. Let the top inch of soil dry out between waterings, and consider adding a thin layer of sand or diatomaceous earth to the surface to disrupt their life cycle.
Finally, many beginners give up because they expect outdoor-scale harvests. A windowsill setup won’t replace your grocery bill, but it will provide fresh garnishes, salad toppers, and the satisfaction of eating something you grew in the middle of winter. Adjust your expectations and the fifth season becomes deeply rewarding.
Your two-week starter plan with minimal gear
Day one: Grab a shallow tray (a plastic takeout container with drainage holes poked in the bottom works fine), fill it with two inches of potting mix, and scatter microgreen seeds densely across the surface. Radish and broccoli are nearly foolproof. Mist the soil, cover the tray with a lid or plastic wrap, and place it somewhere warm but not necessarily bright.
Day three: Remove the cover once you see green shoots. Move the tray to your brightest windowsill or under a light. Mist daily to keep the soil moist but not soggy.
Day seven: Your microgreens should be an inch or two tall. If they’re stretching or pale, add more light. If they’re dense and green, you’re on track.
Day ten to fourteen: Harvest by snipping the greens just above the soil line with scissors. Rinse, pat dry, and toss them into a salad or sandwich. The flavor will be sharper and more vibrant than anything from a store.
While your microgreens grow, start a second tray with lettuce or arugula seeds. Space them a bit farther apart—about half an inch between seeds—and follow the same routine. By week three, you’ll have a rotation going, with new trays started every few days.

Why this trend has staying power
The fifth season isn’t a gimmick. It taps into the same impulse that drives sourdough baking, fermentation, and other hands-on food projects: the desire to create something tangible in a world that feels increasingly abstract and out of our control. Growing food indoors in winter is quiet rebellion against the idea that we’re supposed to sit still and wait for spring.
It also scales beautifully. Start with one tray on a windowsill this January. By next December, you might have a shelf system producing enough greens to skip the salad aisle entirely. The skills you build now—understanding light, water, and timing—transfer directly to outdoor gardening when the weather warms.
The fifth season isn’t about replacing your garden. It’s about refusing to let winter be a blank space on your calendar. Set up a tray this week. By mid-January, you’ll be eating something green that you grew yourself, and that small act will carry you through to spring.