You’ve picked the perfect variety, chosen a sunny spot, and dug a hole twice as wide as the root ball. But if you skip one critical 10-minute step before planting, your fruit tree may sit in the ground for years without ever truly thriving—or worse, slowly decline and die.
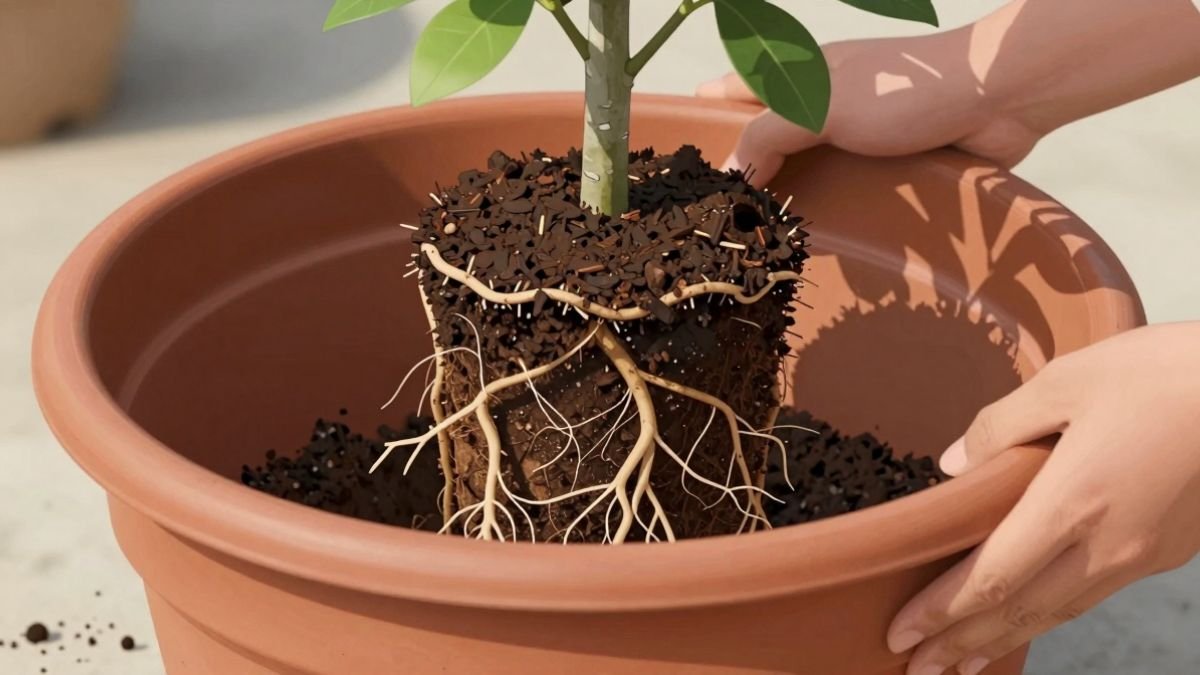
The culprit? Circling and girdling roots that strangle the tree from the inside out. Most nursery trees spend months or years in containers, and their roots grow in tight spirals that never unwind on their own. Plant them as-is, and you’ve buried a time bomb.
The hidden killer: Why transplant shock isn’t the real problem
Most gardeners blame “transplant shock” when a newly planted fruit tree stalls, drops leaves, or fails to put on new growth. But the real issue often lies beneath the soil line.
Circling roots wrap around the trunk like a noose. As the tree grows, these roots thicken and cut off the flow of water and nutrients. The tree essentially strangles itself. You won’t see symptoms for one, two, even three years—until the damage is irreversible.
Girdling roots are especially common in:
- Container-grown trees from big-box stores
- Bare-root trees that were previously potted
- Any tree that’s been in its pot longer than one season
The good news? A simple root check and prune before planting can prevent years of heartbreak.
How to spot circling and girdling roots in 60 seconds
Before you place your tree in the hole, gently remove it from the container and inspect the root ball. Here’s what to look for:
Circling roots spiral around the outside of the root ball in tight loops. They may be thin and fibrous or thick and woody. Either way, they need intervention.
Girdling roots cross over the trunk base or wrap around it. These are the most dangerous. Even one thick girdling root can kill a mature tree.
Matted roots form a dense, impenetrable wall at the bottom or sides of the root ball. Water and nutrients can’t penetrate, and new roots can’t escape.
If you see any of these patterns, don’t panic. You’re about to fix the problem before it starts.
The 10-minute root intervention: Exactly what to do
You’ll need a sharp pair of bypass pruners, a utility knife, and a bucket of water. Follow these steps:
Step 1: Loosen the outer roots (2 minutes)
Use your fingers or a small hand cultivator to gently tease apart the outer inch of the root ball. Work from top to bottom, pulling roots outward. Don’t be afraid to be firm—roots are tougher than they look.
Step 2: Cut circling roots (3 minutes)
With your pruners, snip any roots that circle more than halfway around the root ball. Make clean cuts—don’t tear. Remove woody circling roots entirely. For fibrous roots, cutting them encourages new, outward growth.
Step 3: Score the root ball if needed (1 minute)
If the roots are severely matted, use a utility knife to make three or four vertical cuts from top to bottom, about half an inch deep. This sounds brutal, but it’s far kinder than leaving the tree root-bound.
Step 4: Address girdling roots at the trunk (2 minutes)
Carefully trace any roots that touch or cross the trunk. Use pruners to cut them flush with the trunk base. Do not leave stubs. If a root is thicker than your thumb and removing it would take more than 20% of the root system, consult a local arborist before planting.
Step 5: Soak and inspect the flare (2 minutes)
Submerge the root ball in your bucket for 30 seconds, then lift it out. This reveals the root flare—the point where the trunk widens into roots. You should see this flare clearly. If it’s buried under soil or roots, gently remove the excess until the flare is visible.
The root flare must sit at or slightly above ground level when you plant. Burying it invites rot and pest problems.

Planting depth, hole prep, and the first watering
Now that your roots are prepped, it’s time to plant correctly.
Hole depth: Dig only as deep as the root ball, not deeper. The bottom of the hole should be firm, not loose or fluffy. If you over-dig, the tree will settle and sink, burying the flare.
Hole width: Dig two to three times as wide as the root ball. Wide holes encourage roots to spread into native soil.
Backfill technique: Use the native soil you removed—don’t amend it with compost or potting mix in the hole. Amendments create a “bathtub” effect where roots refuse to leave the planting hole. Instead, spread compost as mulch on the surface.
First watering: Once the hole is half-filled, water deeply to eliminate air pockets. Finish backfilling, then water again. The soil should be moist but not soupy.
Mulch ring: Apply 2 to 4 inches of wood chip mulch in a 3-foot circle around the tree, keeping it 3 inches away from the trunk. Mulch conserves moisture and moderates soil temperature.
Your first 30 days: The care plan that locks in success
The month after planting is make-or-break. Follow this schedule:
Week 1: Water every other day if there’s no rain. Saturate the root zone slowly—use a hose on low or a soaker hose for 20 minutes.
Week 2–4: Transition to twice-weekly deep watering. The goal is to keep the root zone consistently moist, not wet. Stick your finger 3 inches into the soil—if it’s dry, water.
Staking: Only stake if your site is windy or the tree can’t stand on its own. Use soft ties and remove stakes after one year. Over-staking weakens the trunk.
Pruning: Don’t prune the canopy at planting time unless you’re removing dead or broken branches. The tree needs every leaf to photosynthesize and establish roots.
Fertilizing: Skip it for the first year. Fertilizer pushes top growth before roots are ready to support it. Let the tree focus on root establishment.
Monitoring: Check the base of the trunk weekly. Look for signs of settling (root flare disappearing), pest activity, or waterlogged soil. Adjust watering as needed.

Why this matters in December 2025—and beyond
Right now, in mid-December across much of the United States, deciduous fruit trees are dormant. This is actually one of the best times to plant bare-root or container stock in mild-winter regions like the South and West Coast. The tree can establish roots all winter without the stress of supporting leaves.
In colder zones, use this time to plan your spring planting and order trees early. Bare-root stock ships in late winter, and performing this root check on a dormant tree is easier and less stressful for the plant.
But the real value of this 10-minute intervention is evergreen: whether you plant in 2025, 2026, or beyond, circling roots will always be a threat, and this technique will always be the solution.
Skip it, and you’re gambling with years of growth. Do it, and you’re giving your tree the best possible start.
Take action before you plant
Before your next fruit tree goes in the ground, set a timer for 10 minutes. Inspect, loosen, prune, and expose the flare. It’s the single highest-return investment you can make in your tree’s future.
Your harvest—five, ten, twenty years from now—starts with what you do in the next 10 minutes.