You’re about to toss a gallon milk jug into the recycling bin when a thought stops you: what if that jug could grow stronger, stockier tomato seedlings than your sunny windowsill ever did?
Winter sowing flips the script on indoor seed starting. Instead of babying trays under grow lights and watching stems stretch thin and pale, you’re harnessing the outdoors—freezing nights, thawing days, and all—to raise seedlings that are tough, compact, and ready to hit the ground running come spring. The secret weapon? A clean milk jug, a few quick cuts, and the willingness to let nature do the heavy lifting while you stay warm inside.
What winter sowing actually is
Winter sowing is the practice of starting seeds outdoors in transparent, vented containers during the coldest months of the year. The containers act as miniature greenhouses, trapping warmth during the day and protecting seeds from wind and pests, while the cold nights provide the natural temperature swings many seeds need to germinate properly.
Unlike indoor starting, there’s no hardening off drama. Seedlings grow accustomed to wind, temperature fluctuations, and direct sun from day one. By the time transplant season arrives, they’re already conditioned.
The method works best for hardy annuals, perennials, and vegetables that tolerate or require cold stratification—seeds that would naturally drop to the ground in fall and sprout in early spring. Think calendula, snapdragons, kale, spinach, and many native wildflowers.
The exact jug cut and ventilation setup
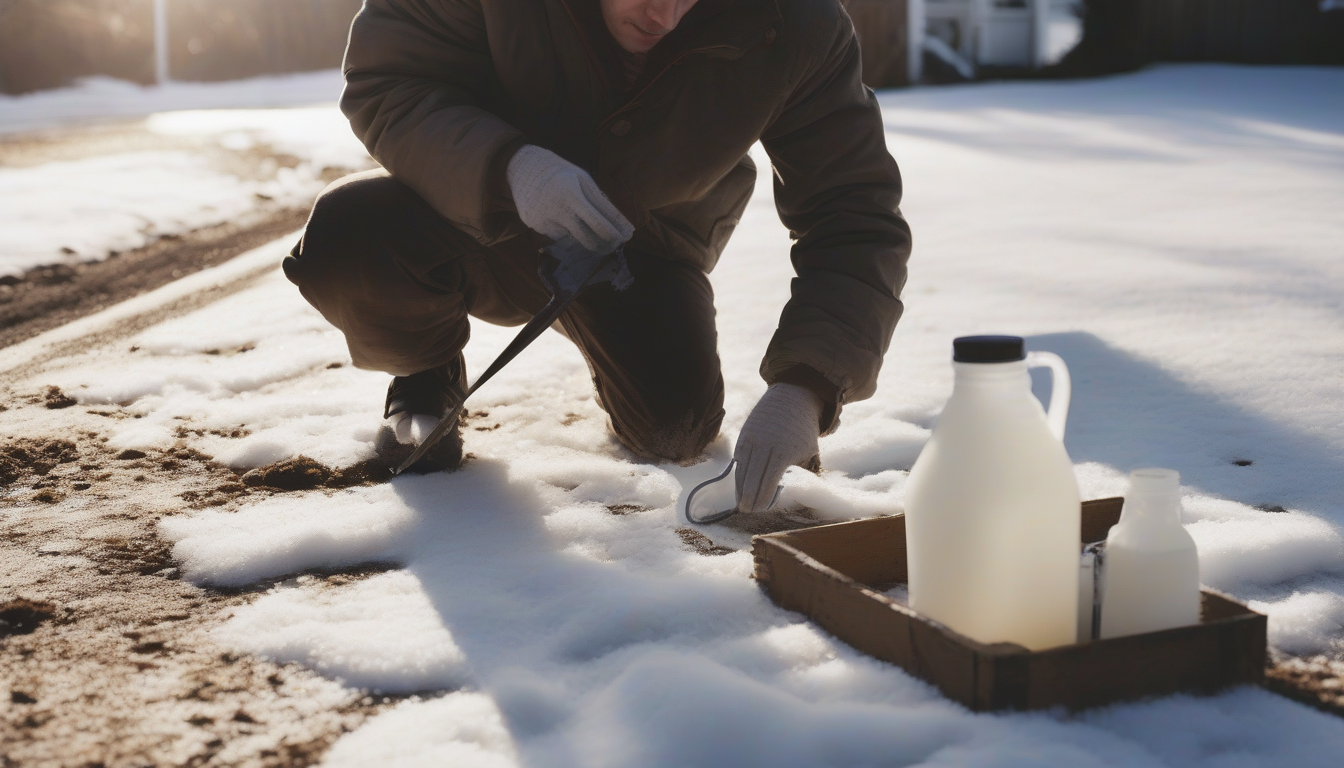
Grab a clean, empty gallon milk jug with the cap still attached. You’ll need a sharp utility knife or heavy-duty scissors, a permanent marker, and a drill or nail for poking holes.
Here’s the cut: Draw a line around the jug about three to four inches up from the bottom. Leave a two-inch “hinge” on one side—don’t cut all the way through. This hinge lets you open and close the jug like a clamshell without losing the top half.
Next, ventilation. Use a drill bit, heated nail, or sharp knife tip to poke four to six drainage holes in the bottom of the jug. Then add four to six small air holes in the top half, just below the cap area. These let excess heat escape on sunny days and prevent mold.
Keep the cap on during the coldest weeks (January through early March in most of the U.S.). Once daytime temps consistently hit the mid-40s Fahrenheit, unscrew the cap to increase airflow and prevent overheating.
Best seeds for the milk jug method
Not every seed thrives in winter sowing, but the winners are spectacular.
Top performers include:
- Hardy annuals: Calendula, larkspur, snapdragons, sweet alyssum, bachelor’s buttons
- Perennials: Echinacea, rudbeckia, columbine, lupine, foxglove
- Vegetables: Kale, spinach, arugula, lettuce, Swiss chard, onions
- Herbs: Parsley, cilantro, chamomile
Avoid heat-lovers like tomatoes, peppers, basil, and zinnias unless you’re starting them later in the season (late March or April, depending on your zone). These need consistently warm soil to germinate and will just sit dormant in the cold.
Check the seed packet for clues. If it says “direct sow in early spring” or “cold stratification recommended,” it’s a great candidate.

Soil choice and moisture management
Use a sterile seed-starting mix, not garden soil. Garden soil compacts in containers, holds too much water, and can introduce damping-off disease. Seed-starting mix is light, fluffy, and drains well—critical when your jugs will sit through freeze-thaw cycles.
Fill the bottom half of the jug with about three to four inches of moistened mix. Press it down gently but don’t pack it. Scatter seeds on the surface according to packet spacing (usually a light sprinkle for small seeds, a bit more space for larger ones). Cover lightly with more mix if the packet recommends it—many small seeds need light to germinate and should stay on the surface.
Water gently until the mix is evenly moist but not soggy. Close the jug along the hinge and seal it with duct tape or packing tape. Label the outside with the seed variety and date using permanent marker.
Set the jugs outside in a spot that gets at least four to six hours of sun. A south-facing wall, driveway edge, or patio works well. Don’t worry about snow—it insulates and provides moisture as it melts.
You rarely need to water again until spring. The jug traps condensation, creating a self-watering cycle. Check every few weeks; if the soil looks dry and crumbly, add a splash of water.
When to open and transition seedlings
Seedlings will begin to sprout as temperatures warm in late winter or early spring—typically late February through April, depending on your hardiness zone. Once you see green shoots, start monitoring daytime temperatures.
When daytime highs regularly reach the mid-40s to low 50s Fahrenheit, remove the cap to increase ventilation. On especially warm days (above 60°F), you can prop the jug open along the hinge or remove the tape entirely for a few hours.
By the time your last frost date approaches, seedlings should have several sets of true leaves and be ready to transplant. Because they’ve been outdoors all along, there’s no hardening off required—just pop them out of the jug, separate gently, and plant.
If seedlings look crowded, you can thin them by snipping extras at soil level with scissors. Don’t pull—you’ll disturb roots.

Common failures and quick fixes
Even the simplest method has hiccups. Here’s how to troubleshoot the most frequent issues.
No germination by early spring: Check the seed packet’s germination time and temperature requirements. Some perennials take weeks or even months. If it’s been long enough, the seeds may have been old or non-viable. Try a fresh packet next time.
Mold or fungus on the soil surface: Too much moisture and not enough airflow. Open the cap or prop the jug open during the day. Mold on the surface usually won’t harm seeds, but if seedlings start damping off (falling over at the base), it’s a fungal issue. Increase ventilation immediately and avoid overwatering.
Leggy, stretched seedlings: Not enough light. Move jugs to a sunnier spot. This is rare with winter sowing since outdoor light is much stronger than windowsills, but north-facing spots or deep shade can cause problems.
Jugs blow over or fill with water: Add a rock or brick inside the jug for weight, or set jugs in a shallow tray or crate. Make sure drainage holes are clear.
Seedlings look stunted or yellowing: They may need a gentle feed. Once seedlings have two sets of true leaves, you can water with a very dilute liquid fertilizer (quarter strength). Seed-starting mix has few nutrients, so a light boost helps.
Winter sowing isn’t about perfection—it’s about working with the weather instead of against it. The milk jugs you rescue from the recycling bin become tiny ecosystems, and the seedlings that emerge are resilient, compact, and ready to thrive. Start a few jugs this January, label them with a Sharpie, and set them outside. By April, you’ll have a small army of plants that didn’t cost you a dime in grow lights or a single leggy stem.